
Affiliate Disclaimer: This post contains affiliate links, and as an Amazon Associate we earn from qualifying purchases. If you buy through our links, we may earn a small commission at no extra cost to you. We only recommend products we genuinely believe you will enjoy.
📘 Recommended for beginners: Complete Starter Guide to Whittling
With over 300,000 copies sold, this classic has introduced more people to whittling than any other guide. Inside are 24 easy, confidence-building weekend projects, the four essential knife cuts, safe carving habits, blade sharpening, and ready-to-carve patterns with clear step-by-step photos. All you need is a pocketknife, a twig, and this book, with no prior experience required.
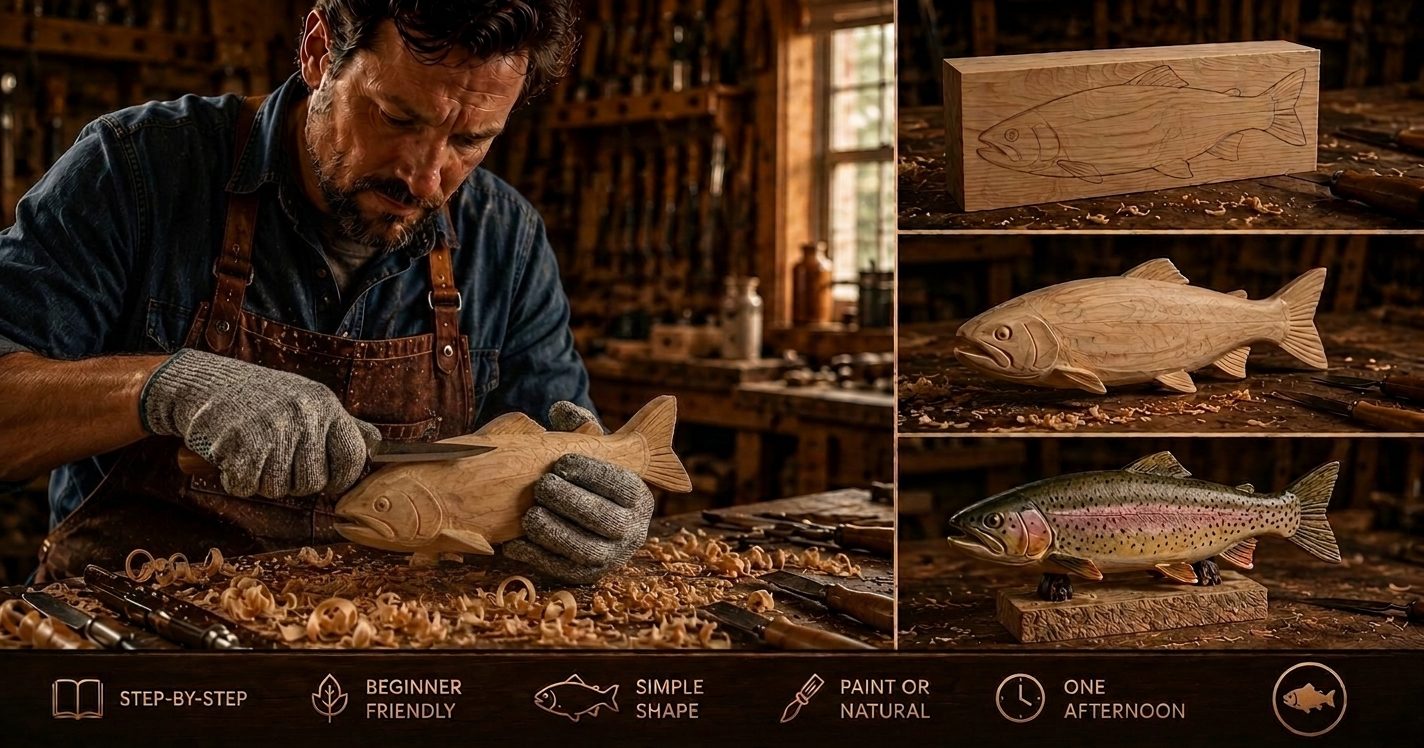
A carved wooden fish is one of the best projects a beginner can choose. The shape is simple and flowing, the proportions are forgiving, and the finished piece looks great whether you leave it natural or paint it. Fish have been a favorite of whittlers for generations, from folk-art keychains to lifelike trout, and they remain one of the most satisfying carves you can complete in an afternoon.
This guide walks you through carving a simple wooden fish from start to finish. You will learn what wood and tools to use, how to shape the body, how to add fins and detail, and how to finish the piece so it lasts. No prior experience is needed.
What you will need
Keep it simple. This project needs very little.
- A block of basswood. A piece around five to six inches long and about two inches square is a comfortable size for a first fish. Basswood is soft, even grained, and carves cleanly, which makes it ideal for beginners.
- A carving knife. One good whittling knife will do almost all of the work. A detail knife helps with the fins and the eyes.
- A pencil. For drawing your pattern on the wood.
- A cut-resistant glove. Worn on the hand holding the wood.
- Sandpaper. A few grits from medium to fine, if you want a smooth finish.
- A finish. Mineral oil, boiled linseed oil, or a wax. Paint is optional if you want color.
Choose your fish design
Before you cut anything, decide what kind of fish you want. For a first project, keep the shape simple and the fins modest. A few beginner-friendly options work well.
- A folk-art fish. A stylized, slightly chunky fish with a broad tail. This is the classic beginner carve, forgiving and full of character.
- A trout or bass. A more realistic streamlined body. Still very approachable, and a favorite for anglers.
- A simple minnow or bait fish. Small and quick, a good warm-up.
You can sketch your own profile or trace a pattern. Either way, you want a side view that shows the body, the tail, and the rough position of the fins.
Step one, draw the pattern on the wood
Draw the side profile of your fish onto one of the wide faces of the block. Start with a gentle almond shape for the body, then add the tail flaring out at the back. Mark where the top fin, side fins, and tail will sit. Keep the tail thick at this stage, since a thin tail can snap while you carve. You can always slim it down later.
On the top face of the block, sketch how wide the fish should be. Fish are narrow from top to bottom relative to their length, so this line guides how much wood you remove from the sides.
Step two, rough out the body
Now remove the wood outside your side profile. Work slowly and take thin shavings. Carve down to your pencil line around the body and tail, leaving the outline standing. Always carve away from your body and your holding hand, and plan each cut before you make it.
Once the side profile is roughed out, start rounding the body. A fish body is not flat. It is rounded on the top and belly and tapers toward the tail. Round over the sharp corners of the block until you have a smooth, slightly plump body shape. Do not worry about detail yet. Your only goal here is a clean, rounded fish form with a tail.
Step three, shape the tail and refine the body
With the body rounded, turn to the tail. Thin it down gradually from both sides so it looks like a fin rather than a block. Give it a slight curve or a notch in the center for a natural forked look if you like. Go slowly, because the tail is the most fragile part and the grain there can be short.
Step back and check the whole shape from several angles. Look at the fish from the top, the side, and head on. Fix any flat spots or lumps now, while the surface is still simple. It is much easier to correct the overall form before you add fins and detail.
Step four, add the fins
Fins bring a fish to life. You have two options. You can carve them as raised shapes that stand slightly off the body, or you can suggest them with shallow lines cut into the surface. For a first fish, suggesting the fins with a detail knife is the safest choice, since carved raised fins are delicate and can break.
Mark the top fin, the two side fins, and the smaller fins near the tail. Using your detail knife, make a stop cut along the base of each fin, then carve gently up to it so the fin stands out in low relief. Add a few fine lines along each fin to suggest the rays. Keep these cuts light and even.
Step five, carve the face and eyes
The head is simple. Define the gill line with a shallow curved cut on each side, just behind where the head meets the body. Add the mouth with a small stop cut at the front. For the eyes, either carve two small shallow circles or press a rounded tool to leave a domed eye. Keep the eyes modest and symmetrical. Even a hint of an eye makes the fish look finished.
Step six, sand or leave the facets
Now decide on the surface. For a smooth realistic fish, sand the body starting with a medium grit and working to a fine one. Sand with the shape, not across it, and be gentle around the fins. For a folk-art or rustic look, leave the knife facets showing. Both approaches look great, so it comes down to the style you want.
Step seven, add scales or texture, optional
If you want scales, you can suggest them with a small U-gouge or the tip of your knife, working in overlapping rows from the tail toward the head. This is optional and takes patience, so feel free to skip it on your first fish and leave the body smooth. Many of the most charming carved fish have no scales at all.
Step eight, finish the fish
Finishing protects the wood and brings out its character. For a natural look, rub in a coat of mineral oil or boiled linseed oil, let it soak in, and wipe off the excess. A wax finish over the top adds a soft sheen. If you want color, acrylic paint works well on basswood. Many carvers paint the fish and then apply a light wash or a matte sealer so it does not look too glossy. Let each coat dry fully before handling.
Tips for a better carved fish
- Keep your knife sharp. A sharp blade glides through basswood and gives you control. A dull one forces you to push, which is when slips happen.
- Leave the tail thick until the end. Thin it last so it does not break while you handle the piece.
- Carve the shape first, detail last. Resist adding fins and eyes until the body is right. Detail added too early usually gets carved away.
- Study a real fish. A quick look at a photo of the species you are carving helps you place the fins and eyes correctly.
- Make more than one. Your second fish will be noticeably better than your first. Fish are quick, so carve a small school of them and watch your skills grow.
Common mistakes when carving a fish
A few simple mistakes catch most beginners, and all of them are easy to avoid once you know about them.
- Thinning the tail too soon. The tail is the most fragile part, and short grain there breaks easily. Leave it thick through the whole rough-out and only thin it near the end.
- Carving the body too flat. A real fish body is rounded and slightly plump, not slab-sided. Keep rounding the top and belly until the cross section looks full rather than flat.
- Oversized fins. Large raised fins look dramatic but snap easily and can throw off the proportions. For a first fish, suggest the fins in low relief instead of carving them tall.
- Rushing to detail. Adding the eyes, gills, and scales before the body shape is right almost always means carving them away later. Finish the form first.
- Working with a dull knife. A dull blade tears basswood and forces you to push, which is when slips happen. Strop your knife before you start and keep it keen throughout.
Painting your fish for a realistic look
Painting is optional, but it can turn a simple carve into a striking piece, especially for a recognizable species like a trout or bass. Acrylic paint works well on basswood and dries quickly. The trick to a natural result is to build up thin layers rather than laying down one heavy coat. Start with the base color of the fish, let it dry, then add the darker back, the lighter belly, and finally the markings and spots.
For a softer, more lifelike finish, thin your paint into a wash so the grain shows through slightly, and blend the transition between the darker top and lighter belly while the paint is still wet. Once the paint is dry, a matte or satin sealer protects it and keeps the fish from looking too glossy. If realism is not your goal, a bold folk-art paint job with bright colors and simple patterns looks wonderful too and is very forgiving.
Ways to use your carved fish
A carved fish is more than a shelf piece. Drill a small hole and add a ring to turn it into a keychain. Mount it on a small wooden base or a slice of branch for a display piece. A set of small fish makes a lovely rustic wall arrangement. Painted fish become ornaments or gifts, and anglers love a carved version of the species they chase. Because fish are quick to make, they are also a popular item at craft fairs and markets.
Where to go from here
Once you have a fish or two under your belt, the same skills carry straight over to other animals. Birds, ducks, and owls all use the same rough-then-refine approach. If you enjoyed this, our guide to easy wood carving projects for beginners has sixty more ideas to try.
And if carving leads you toward bigger woodworking builds, from tackle boxes to furniture, a large plans library makes those projects far easier to tackle with confidence.
Explore 16,000+ Woodworking Plans →
Grab a block of basswood, sketch a simple fish, and start removing wood. Take your time, keep your cuts thin, and enjoy the process. Your first carved fish is waiting inside that block.