Affiliate Disclaimer: This post contains affiliate links, and as an Amazon Associate we earn from qualifying purchases. If you buy through our links, we may earn a small commission at no extra cost to you. We only recommend products we genuinely believe you will enjoy.
Joinery is what separates a wobbly box held together with nails from a piece of furniture that lasts for generations. A woodworking joint is simply the way two pieces of wood are connected, and there are many ways to do it, from dead simple to beautifully intricate. Understanding the common joints, what each one is good for, and which to learn first is one of the most useful things a beginner can do, because joints are the building blocks of nearly every project.
This guide walks through the joints you are most likely to use, in plain language, so you know what they are, when to reach for them, and how to grow your skills from the easy ones to the impressive ones.
Why joints matter
You can hold wood together with nails and screws, and sometimes that is all a project needs. But learning joinery gives you three real advantages. Joints are stronger, since a well-made joint spreads load through the wood itself rather than relying on a fastener that can pull out. They look better, because a good joint hides the connection or even shows it off as a feature, with no visible screws. And they teach you skills that make every future project cleaner and more solid. You do not need to master them all, but knowing the basics opens up what you can build.
The butt joint
The butt joint is the simplest joint there is. You just push the end of one board against another and fasten them with glue, nails, or screws. It is quick and requires no special skill, which makes it perfect for beginners and for rough projects. Its weakness is strength, since there is not much surface for glue to grip and fasteners can work loose over time. It is fine for simple boxes and light-duty work, and it is often the right starting point while you build confidence.
The miter joint
A miter joint is like a butt joint but with both pieces cut at an angle, usually forty-five degrees, so they meet to form a corner with no end grain showing. This is what you see on picture frames and trim. It looks clean and tidy, but on its own it is not very strong, so it is often reinforced with glue plus a spline, dowels, or fasteners. It is a great joint to learn for frames and decorative corners.
Rabbets, dadoes, and grooves
These three related joints all involve cutting a recess into a board so another piece fits into it, and they add a lot of strength and a clean look. A dado is a slot cut across the grain, commonly used to hold shelves in a bookcase. A groove is the same kind of slot but running with the grain, often used to hold a panel or a drawer bottom. A rabbet is a step cut along the edge of a board, useful for joining corners and setting in back panels. These joints locate the pieces precisely and give glue plenty of surface to grip, which makes them far stronger than a plain butt joint while still being beginner-friendly.
The pocket hole joint
The pocket hole joint is a modern favorite for good reason. Using a pocket hole jig, you drill an angled hole into one piece and drive a screw through it into the other, creating a strong, quick joint with no visible fastener on the show side. It is fast, forgiving, and very beginner-friendly, and it is excellent for building cabinets, frames, and furniture quickly. Many new woodworkers find a pocket hole jig one of the most useful early purchases, since it lets them build solid projects before they have learned traditional joinery.
Dowel and biscuit joints
Both of these use small inserts to align and strengthen a joint. A dowel joint uses round wooden pegs that fit into matching holes drilled in both pieces, which keeps the parts aligned and adds strength. A biscuit joint uses a flat, oval wooden biscuit that slots into curved cuts made by a special tool, then swells with the glue’s moisture to lock the pieces together. Both are great for joining boards edge to edge to make wide panels, like a tabletop, and for general assembly. They are hidden, tidy, and quite approachable once you have the right tool.
The mortise and tenon joint
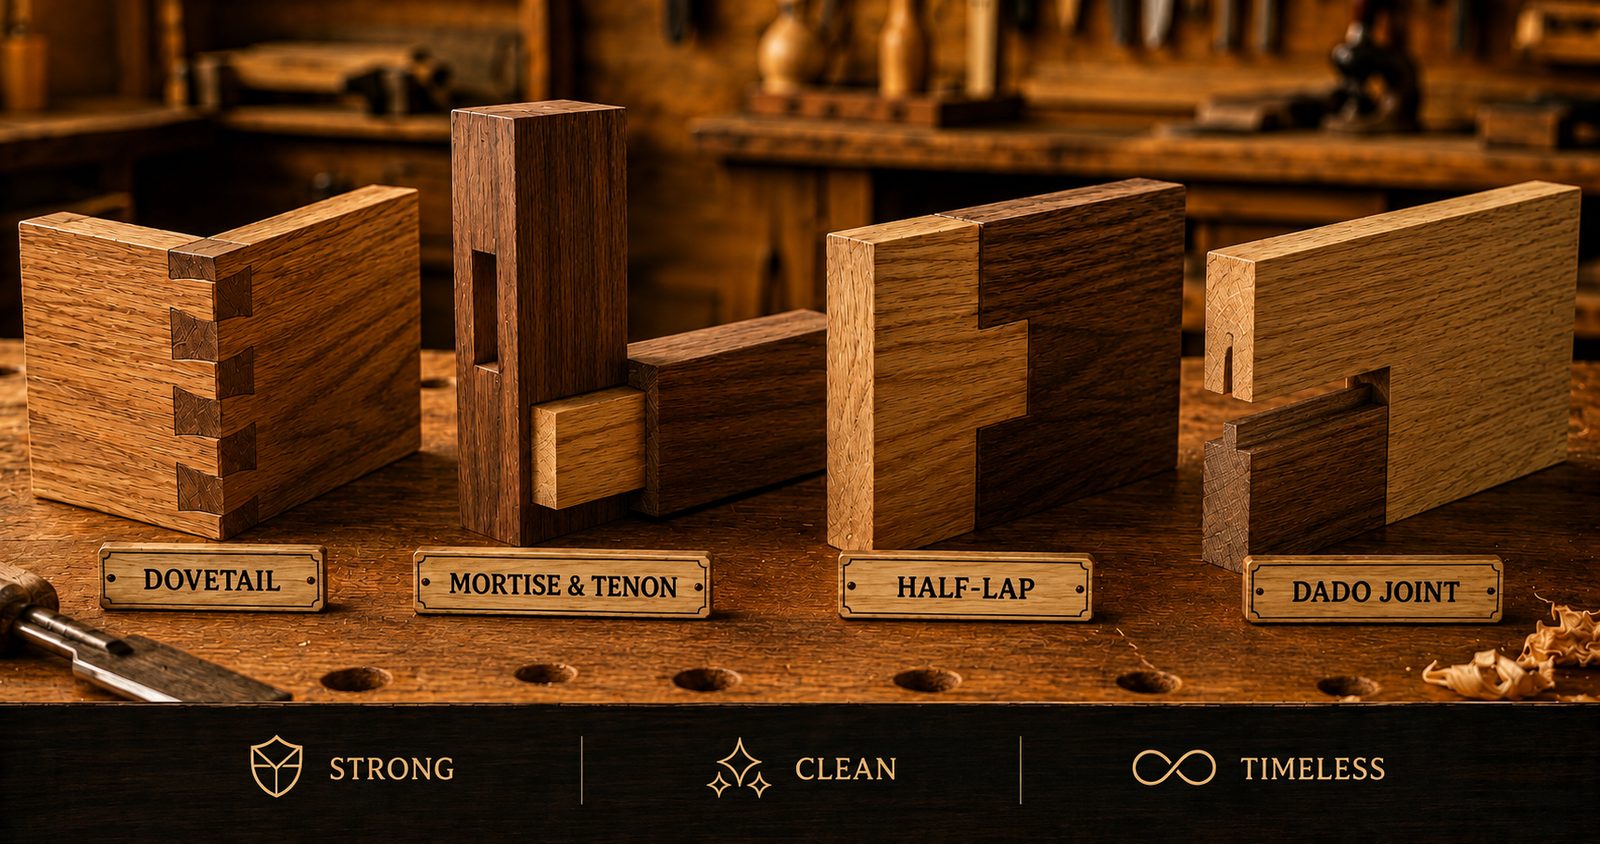
The mortise and tenon is one of the strongest and most respected joints in woodworking, and it has been used for thousands of years. One piece has a tongue, the tenon, cut on its end, and the other has a matching hole, the mortise, cut into it. The tenon fits snugly into the mortise and is glued in place, creating a very strong connection. It is the classic joint for tables, chairs, and frames where strength matters. It takes practice to cut well, so it is a joint to grow into, but it is well within reach once you are comfortable with the basics.
The dovetail joint
The dovetail joint is the showpiece of woodworking joinery. Interlocking, wedge-shaped fingers, shaped like a dove’s tail, lock two pieces together at a corner, most famously on drawers and fine boxes. It is both extremely strong, since the shape resists being pulled apart, and beautiful, which is why woodworkers often leave it visible as a mark of quality. Cutting dovetails by hand is a skill that takes practice, and many beginners start with a dovetail jig and a router to make them more easily. It is a joint to aspire to, and mastering it is a genuine milestone.
Tongue and groove, and half-lap joints
A couple more joints are worth knowing. Tongue and groove joins boards edge to edge, with a tongue on one board fitting a groove on the next, commonly used for flooring, paneling, and tabletops. The half-lap joint removes half the thickness from each of two pieces where they cross or meet, so they overlap flush, which is a simple, strong way to join frames and is easier than it looks. Both are practical joints that come up often once you start building.
Which joints to learn first
You do not need to learn everything at once. A sensible path is to start with the butt joint for simple projects, add the pocket hole joint so you can build solid furniture quickly, and learn rabbets, dadoes, and grooves for shelves and cases. From there, dowel and biscuit joints let you make nice wide panels. Once those feel comfortable, work toward the mortise and tenon for strong furniture, and finally the dovetail as your showpiece skill. Each one builds on the last, and each opens up new projects.
The tools that make joinery possible
Different joints call for different tools. A good hand saw and a set of sharp chisels will let you cut many joints by hand, which is a rewarding way to learn. A cordless drill handles dowel holes, and a doweling jig keeps them aligned, while a pocket hole jig handles pocket joints. A router is the workhorse for rabbets, dadoes, grooves, and dovetails with the right jig. And a biscuit joiner makes quick work of biscuit joints. You can start with just a saw and chisels and add tools as the joints you want to make require them.
How to choose the right joint for the job
With so many joints available, it helps to have a simple way to pick one. Ask yourself two questions: how much strength does this connection need, and how much do I want the joint to show. For a quick, hidden, strong connection in furniture, a pocket hole or a dowel joint is ideal. For shelves and cases, a dado holds the shelf and adds strength. For frames and corners, a miter looks clean and a half-lap adds strength. For heavy-duty furniture like tables and chairs, a mortise and tenon is the classic answer. And for a drawer or box where you want to show off craftsmanship, a dovetail is the showpiece. Matching the joint to the job, rather than using the same one everywhere, is a big part of building things that are both strong and good-looking.
Glue makes the joint
It is worth understanding that in most modern woodworking, the glue is doing a lot of the work. A well-fitted joint with good glue coverage and firm clamping is remarkably strong, often stronger than the surrounding wood. That is why a clean, snug fit matters so much, since glue bonds best when the surfaces meet closely with no gaps. Ordinary wood glue is all you need for most joints, applied to both surfaces and clamped until dry. The joint’s shape, like the interlocking fingers of a dovetail or the tongue of a tenon, adds mechanical strength on top of the glue, which is what makes traditional joinery so durable. Get the fit right and the glue right, and your joints will outlast almost everything else.
Tips for stronger, cleaner joints
- Measure and mark carefully. Joinery is precise work, and a small marking error becomes a visible gap. A sharp pencil or a marking knife and a good square are your friends.
- Keep your tools sharp. Sharp saws and chisels cut cleanly and accurately, while dull ones tear the wood and wander off the line.
- Practice on scrap first. Before cutting a joint on your real project, make one on a scrap piece to dial in your setup and your technique.
- Dry fit before glue. Always fit the joint together without glue to check it, since it is far easier to adjust before the glue is on.
- Clamp well. A good glue joint needs firm, even clamping pressure while it dries, so keep plenty of clamps on hand.
Frequently asked questions
What is the easiest woodworking joint for beginners? The butt joint is the simplest, since you just fasten two pieces together with glue and screws or nails. For a stronger but still beginner-friendly option, a pocket hole joint made with a jig is quick and very forgiving.
What is the strongest woodworking joint? The mortise and tenon and the dovetail are among the strongest traditional joints. Both spread load through the wood itself and, when well made and glued, are often stronger than the surrounding wood.
Do I need expensive tools to cut joints? Not to start. A hand saw and a set of sharp chisels will cut many joints. A drill with a pocket hole jig and, later, a router expand what you can make, but you can learn a lot with just the basics.
Which joint should I learn first? Start with the butt and pocket hole joints for quick, solid projects, then learn rabbets, dadoes, and grooves for shelves and cases. Work up to the mortise and tenon and the dovetail as your skills grow.
Put your joints to work
Learning joinery is one of the most rewarding parts of woodworking, and it directly improves everything you build. The best way to learn is to use these joints on real projects, starting simple and adding a new joint each time you are ready. Working from complete plans that call out which joints to use, with clear measurements, takes the mystery out of the process and lets you practice each joint in a real build. Start with the easy joints, be patient with the harder ones, and before long you will be making connections that are strong, clean, and something to be proud of.