Affiliate Disclaimer: This post contains affiliate links, and as an Amazon Associate we earn from qualifying purchases. If you buy through our links, we may earn a small commission at no extra cost to you. We only recommend products we genuinely believe you will enjoy.
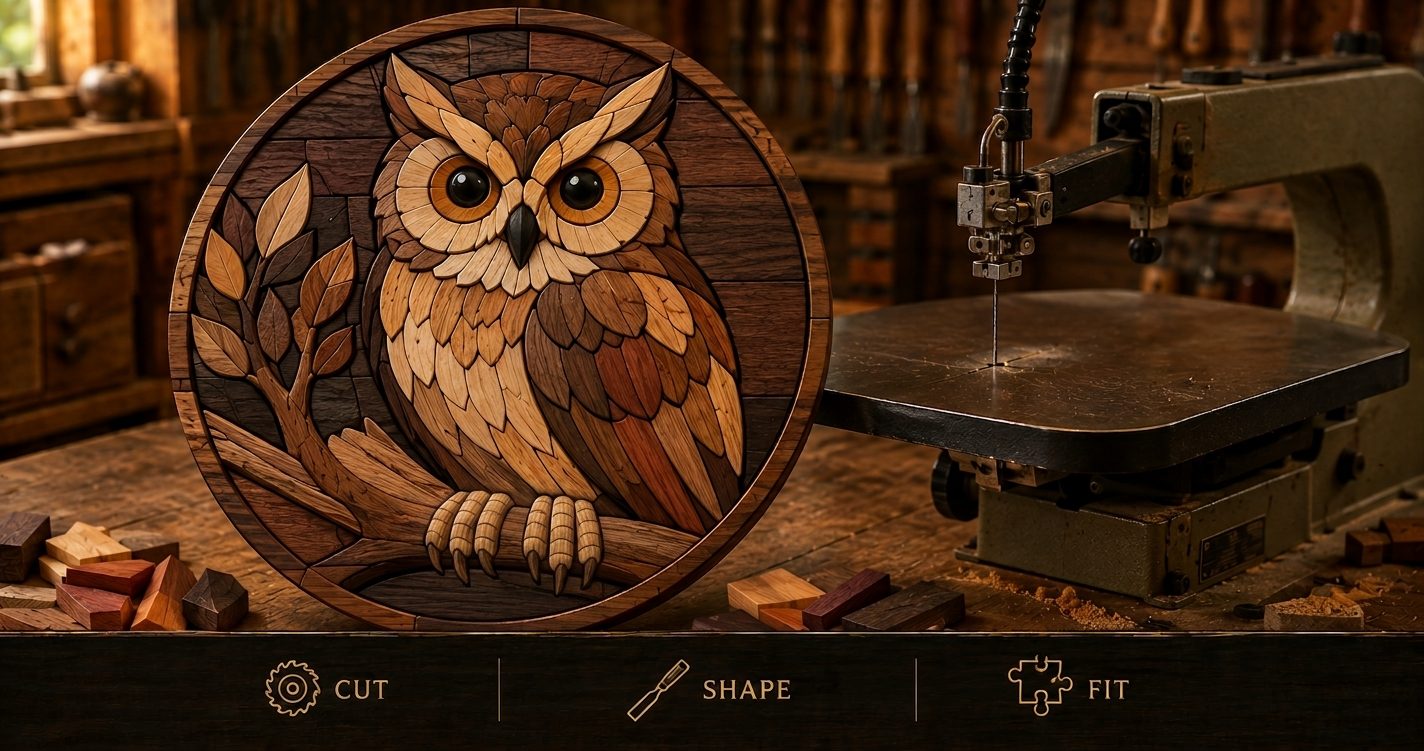
Intarsia is one of the most striking things you can make from wood, and it is more approachable than it looks. It is the art of creating a picture or design from many separate pieces of wood, each chosen for its natural color and grain, then shaped and fitted together like a three-dimensional mosaic. The finished piece has depth, warmth, and a hand-crafted beauty that paint simply cannot match, because every color you see is the real color of the wood.
If you have enjoyed carving or you love the look of a detailed wooden owl or animal, intarsia is a natural next step. This guide explains what intarsia is, the tools and wood you need, and how a beginner project comes together, so you can make your first piece with confidence.
What intarsia actually is
In intarsia, you take a pattern, cut out each shape from a piece of wood chosen for its color, then shape and sand each piece so the finished design has raised and lowered areas that give it real dimension. The pieces are fitted tightly together and glued onto a backing board, and the result is a wooden picture that stands slightly proud of its surface, with the different wood tones forming the image.
People sometimes confuse intarsia with marquetry. The difference is that marquetry uses thin veneers glued flat to create a smooth, level image, while intarsia uses thicker pieces that are shaped and contoured, giving the work its distinctive three-dimensional, sculpted look. That shaping is a big part of what makes intarsia so satisfying to make and so lovely to look at.
Why intarsia is worth trying
The magic of intarsia is that all the color comes from the wood itself. A rich brown walnut, a pale maple, a warm cherry, a golden oak, each contributes its natural tone, so the finished piece glows in a way a painted design never quite does. Because you also shape each piece, an owl’s chest can be rounded, a wing can be layered, and the whole design gains life and depth.
It is also a craft that rewards patience rather than raw skill. If you can trace a pattern, cut along a line, and sand a piece to shape, you can make intarsia. It takes time and care, but the steps themselves are simple, which makes it very beginner-friendly for anyone willing to go slowly.
The tools you will need
Intarsia does not require a huge workshop, but a few tools make it possible and enjoyable.
The key tool is a scroll saw. This is the machine that lets you cut the intricate curves and shapes that intarsia is made of, and it is the one purchase that really opens up the craft. A scroll saw is beginner-friendly, relatively quiet, and useful for all sorts of detailed cutting beyond intarsia. You will also want a way to shape and smooth your pieces, which can be a small power sander, a rotary tool, or simply sandpaper in a range of grits and plenty of patience. Beyond that you need wood glue, a backing board such as thin plywood to mount the finished design on, and a pencil and some carbon or graphite paper to transfer your pattern.
A rotary tool with sanding attachments speeds up the shaping considerably, and many intarsia makers find it their favorite tool for adding contours, but you can absolutely start with hand sanding while you learn.
Choosing your wood
The heart of intarsia is color, and you get that from using different species of wood in their natural tones. Rather than staining, intarsia artists collect woods in a range of colors and use them where each color suits the design. Common choices include pale maple, aspen, or holly for light areas, warm oak and cherry for mid tones, and rich, dark walnut for shadows and accents.
You do not need a big collection to start. A first project might use just three or four contrasting woods. Many beginners build up a stash of small offcuts in different colors over time, which is one of the pleasures of the craft. Boards around a half to three quarters of an inch thick are typical, since you need some thickness to shape and contour the pieces.
Start with a simple pattern
Your first intarsia project should have relatively few pieces and clear, bold shapes. Small animals, leaves, simple flowers, and of course owls are classic beginner subjects, and an owl is a perfect fit if you have enjoyed our wooden owl carving ideas, since it uses layered feathers and contrasting tones beautifully. Look for a beginner intarsia pattern with maybe ten to twenty pieces rather than a complex design with a hundred. You will learn all the core skills on a simple pattern, and the finished piece will still look wonderful.
How an intarsia piece comes together
While each project varies, the process follows the same steps, and understanding them makes the craft far less mysterious.
- Transfer the pattern. You copy the pattern onto your chosen woods, placing each piece on the color you want for that part of the design.
- Cut out the pieces. Using the scroll saw, you carefully cut each piece to its shape, staying right on the line so the pieces fit together neatly.
- Shape and contour. This is where intarsia comes alive. You sand and shape each piece, rounding edges and lowering some areas, so the finished design has depth. A piece that sits higher catches the light and reads as closer, while lowered pieces recede.
- Dry fit. You lay all the pieces together to check the fit and the overall look, adjusting shapes and sanding as needed until everything sits well.
- Glue to the backing. Once you are happy, you cut a backing board to the outline of the design and glue each piece to it, which holds the whole picture together.
- Finish. A final sanding and a clear finish bring out the color and protect the piece.
Tips for your first intarsia project
- Take your time on the fit. Tight, clean joins between pieces are what make intarsia look polished. It is worth sanding a piece two or three times to get it right.
- Use the wood’s grain direction thoughtfully. Running the grain in the direction of a feather or a leaf adds realism and movement to the design.
- Keep your scroll saw blade fresh. A sharp blade gives cleaner cuts and better fits, and it makes the cutting far easier and safer.
- Sand progressively. Start with a coarser grit to shape, then work up to fine for a smooth finish, so no scratches show under the final coat.
- Label your pieces. On a design with many parts, a light pencil mark on the back helps you keep track of where each piece goes.
Common beginner mistakes to avoid
A few mistakes catch most people new to intarsia, and knowing them ahead of time saves frustration. The first is rushing the fit, leaving visible gaps between pieces, when a little extra sanding would have closed them. The second is skipping the shaping and leaving all the pieces flat, which loses the dimension that makes intarsia special. Another is choosing too complex a first pattern, since a design with a hundred pieces will overwhelm you before you finish. Some beginners also stain their wood rather than using naturally colored woods, which fights against the whole point of the craft. And forgetting to sand out saw marks before finishing leaves scratches that show under the final coat. Go slow, start simple, and let the natural wood colors do the work, and you will avoid all of these.
Building your wood stash
Part of the fun of intarsia is collecting woods in different natural colors, and you do not have to buy them all at once. Save offcuts from your other projects, since even small pieces are useful in intarsia. Craft stores and online sellers offer small bundles of mixed hardwoods specifically for projects like this, which is a great way to get a range of colors cheaply. Over time you will build a little library of tones, from pale maple to dark walnut, ready to reach for whenever a design calls for a particular color. That growing stash is one of the quiet pleasures of the craft, and it means your next project is always within reach.
Finishing your work
Intarsia looks best with a finish that deepens the natural colors and lets the different woods shine. A clear oil, a wax, or a light clear coat all work well. Because the color already comes from the wood, you rarely need or want stain. Apply your finish evenly, let it dry, and your piece is ready to hang or display. Many intarsia makers add a small hanger to the back so the finished picture can go straight on the wall.
Where to find intarsia patterns
Good patterns make all the difference when you are learning, since they tell you which pieces to cut, which colors to use, and how they fit together. Start with beginner patterns that have a modest number of pieces and clear shapes, and work up to more detailed designs as your skills grow. Owls, other birds, and simple animals are excellent subjects to begin with and always look impressive on the wall.
If you would like a complete, guided introduction in one place, the book Intarsia Woodworking for Beginners by Kathy Wise is a superb resource. It breaks the craft down into step-by-step lessons with more than twenty patterns across beginner, intermediate, and advanced levels, and it comes from one of the most celebrated intarsia artists and instructors around, which makes it a favorite first book for anyone getting into the craft.
Frequently asked questions
Do I need a scroll saw for intarsia? A scroll saw is the key tool, since it cuts the intricate curves that intarsia is made of. You can attempt very simple designs with a coping saw, but a scroll saw makes the craft far easier and opens up what you can create.
What is the difference between intarsia and marquetry? Marquetry uses thin veneers glued flat for a smooth, level image. Intarsia uses thicker pieces that are shaped and contoured, giving the finished work its distinctive three-dimensional, sculpted look.
Do I stain the wood to get the colors? No. The whole point of intarsia is that the colors come from different natural species of wood, like pale maple and dark walnut. Using natural wood tones rather than stain is what gives intarsia its glow.
How many pieces should a beginner pattern have? Start with a design of roughly ten to twenty pieces. You will learn every core skill on a simple pattern, and the finished piece will still look impressive without overwhelming you.
Give intarsia a try
Intarsia turns a handful of colored wood pieces into a glowing, dimensional picture, and it is far more achievable than it first appears. Pick up a scroll saw, gather a few contrasting woods, choose a simple pattern, and take it one piece at a time. The care you put into cutting, shaping, and fitting is exactly what makes the finished work so beautiful, and your first piece will likely earn a permanent spot on your wall.